Consuming D365 OData and OData actions on .net
Consuming D365 OData and OData actions on .net:
Hello,
This blog is to give the understanding of consuming Odata entities and OData action through .net framework. Odata entities are used for integration purpose. Either we can import data or export. For now ,here I am trying to fetch data from D365 using OData call.
Prerequisites:
In order to consume OData, we must create a console application on visual studio
1. Start a new instance of Visual Studio and create a new console application project. In the New Project dialog, select Installed > Templates > Visual C# > Windows Desktop, and select the Console Application template. Name the project “OData Test”.
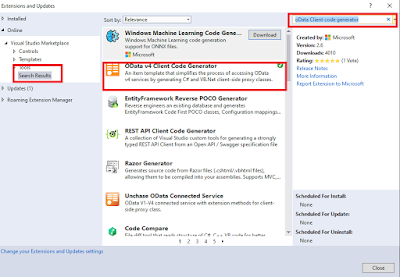
2. Go to Tools à Extensions and Update. It will open a dialog. Expand Online tab from the navigation window and select OData v4 Client Code Generator. Also, you may note that since I have OData client code generator installed, it is showing a green check mark as shown below.
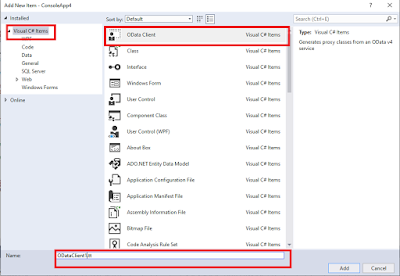
3. Right Click on Console App and select Add New item option. It will open a dialog with navigation window including Visual C# Items ->OData Client. It will generate ODataClient1.tt file
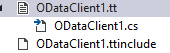
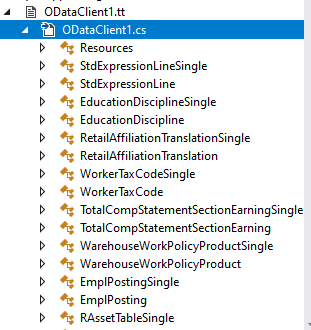
4. ODataClient.tt will add 3 files to your project as shown below:
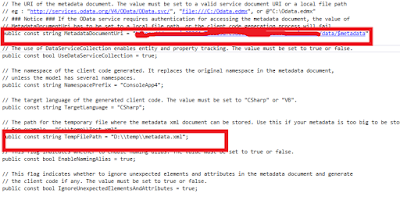
5. Double click on OdataClient1.tt file in your project. It will open configuration file as shown below. Fill MetaDataDocumenturl with your base Url/data/$metaData and provide tempfilePath as highlighted.
Right click on ODataClient1.tt file àRun Custom Tool. It will create metadata of entities on your specified TempFilePath in xml format. It will also show Meta data of exposed entities, which have IsPublic Property set to true.
OData Entities:
Create new entity in D365. Build the model and synchronize database.
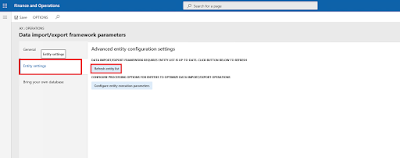
Go to SystemAdministration->DataManagement->Framework Parameter ->Entitiy Settings-> Refresh Entity List
After a while, a message prompting that all entities have been refreshed will appear in message center.
Go to System Administrator -> Data Entities. Create new entity, select newly created staging table, and target entity.
Register [base url] to the the Azure portal. Also, register [base url ] and [Base url]/data] in authentication tab as shown below otherwise data will not populate.
In order to consume Odata entity in .net, first, we need to provide authentication credentials which include Client App id, Azure Resource, Azure ADtenant, and Azure ClientSecret.
Then, write authentication code to verify credentials.
public const string OAuthHeader = "Authorization";
public static AuthenticationResult GenerateAzureToken(AXEnvironments _environment)
        {

            //create the credential object based upon the encrypted secret key in azure
             ClientCredential creds = new clientCredential
            (_environment.WebAzureClientAppId, _environment.AzureClientSecret);

               //setup the context of the token
              AuthenticationContext context = new AuthenticationContext
              (_environment.AzureADTenant, TokenCache.DefaultShared);

               //generate the token
               Task<AuthenticationResult> task = context
               .AcquireTokenAsync(_environment.AzureResource, creds);

            //wait for the task to finish
            task.Wait();

            //return the result
            return task.Result;
        }

        public static string GetAzureAuthenticationHeader(AXEnvironments _environment)
        {
            AuthenticationResult result;
            string authHeader = "";

            try
            {
                //generate the token and get an authorization
                result = GenerateAzureToken(_environment);
                authHeader = result.CreateAuthorizationHeader();
            }
            catch(Exception ex)
            {
                Console.WriteLine( ex.ToString());
                authHeader = "";
            }

            return authHeader;
        }
Once authentication is done, request header is created.
When Context data entity name (context.SalesOrderHeadersCust) is executed it will fetch data from exposed entity.
We have to add parameter to fetch record company wise or set login user default company otherwise, it will search record on DAT company and result set will be null.
static void Main(string[] args)
        {
            try
            {
                string ODataEntityPath = D365Auth.AXEnvironments.Test.UriString + "/data";
                Uri oDataUri = new Uri(ODataEntityPath, UriKind.Absolute);
                var context = new Resources(oDataUri);
                D365Auth.AXEnvironments currentEviornment = D365Auth.AXEnvironments.Test;
                string authHeader = D365Auth.AXAuthorizationDefined
               .GetAzureAuthenticationHeader(currentEviornment);

                context.SendingRequest2 += new EventHandler<SendingRequest2EventArgs>                       (delegate (object sender, SendingRequest2EventArgs e)
                {
                    e.RequestMessage.SetHeader("Accept", "application/json");
                    e.RequestMessage.SetHeader("Authorization", authHeader);
                });


                Console.WriteLine(String.Format("---------- Begin OData Sales Order Entity                    Entity Lookup ----------") + Environment.NewLine);

                foreach (var SalesOrder in context.SalesOrderHeadersCust.Where(p =>                              p.SalesOrderNumber == "000784" && p.DataAreaId == "usmf"))
                {
                    Console.WriteLine("InvoiceAccount:{0}",SalesOrder
                     .InvoiceCustomerAccountNumber);
                }
                Console.ReadLine();

            }
            catch (System.Exception ex)
            {

                Console.WriteLine(ex.ToString());
            }

        }
Output:
Adding OData Actions on data entities:
Through data actions, we can invoke a functionality into data model.
For example, we can confirm sales order or post packing slip or create invoice soon after we create sales order or of existing sales order as shown in code below.
SysODataActionAttribute class is used to expose method as an action. First argument takes in action name and second argument is a Boolean. If bool parameter is true it indicates, action is available to use.
[SysODataActionAttribute("confirmsalesOrder",true)]
    public str confirmSalesOrder(SalesId _salesId)
    {
        SalesFormletter SalesFormletter;
        SalesTable SalesTable;


        SalesFormletter =
        SalesFormletter::construct(DocumentStatus::Confirmation);

        SalesTable.clear();

        SalesTable = SalesTable::find(_salesId);
        SalesFormletter.update(SalesTable,
        systemDateGet(),
        SalesUpdate::All,
        AccountOrder::None,
        false,
        false);
        return "Successful";


    }
To consume it in .net authentication and requesting header procedure is same as in Odata entities consumption code above.
Data is fetched when context dataentity name (context.SalesOrderHeadersCust) is executed along with parameters i.e sales id and dataarea id.
Only one record will return if we use Single () method along with context.SalesOrderHeadersCust as shown below in code.
static void Main(string[] args)
        {
            try
            {
                string ODataEntityPath = D365Auth.AXEnvironments.Test
               .UriString + "/data";
                Uri oDataUri = new Uri(ODataEntityPath, UriKind.Absolute);
                var context = new Resources(oDataUri);
                D365Auth.AXEnvironments currentEviornment = D365Auth.AXEnvironments.Test;
                string authHeader =     D365Auth.AXAuthorizationDefined
                .GetAzureAuthenticationHeader(currentEviornment);

                context.SendingRequest2 += new EventHandler<SendingRequest2EventArgs>                        (delegate (object sender, SendingRequest2EventArgs e)
                {
                    e.RequestMessage.SetHeader("Accept", "application/json");
                    e.RequestMessage.SetHeader("Authorization", authHeader);
                });


                Console.WriteLine(String.Format("---------- Begin OData Sales Order Entity                    Entity Lookup ----------") + Environment.NewLine);

                var SalesOrder = context.SalesOrderHeadersCust.Where(p => p.SalesOrderNumber                   == "000785" && p.DataAreaId == "usmf").Single();
                string value = SalesOrder.ConfirmsalesOrder("000785").GetValue();
                Console.WriteLine("Name: {0}", value);
                Console.ReadLine();


            }
            catch (System.Exception ex)
            {

                Console.WriteLine(ex.ToString());
            }


        }

